Thursday, March 31, 2011

GIVEAWAY! "She Believed She Could So She Did" Wall Print

One of my wonderful customers emailed me the other day to ask me if I would host a giveaway on her blog for the print that she purchased from me, "She Believed She Could So She Did" - http://www.etsy.com/listing/69097558/she-believed-she-could-so-she-did-wall.

Her blog is so inspirational and so uplifting that I had to say, "Yes!"

Head over to Faith Hope Love for your chance to win my print "She Believed She Could So She Did". The winner will be announced on Monday, April 4!

Photobucket

My Latest Wall Prints

Here are my most recent Etsy Wall Print listings -

Sweet Dreams -
http://www.etsy.com/listing/70132163/sweet-dreams-owl-moon-stars-wall-art

Photobucket


Butterfly Wall Art with Custom Name -
http://www.etsy.com/listing/70273730/butterfly-wall-art-with-custom-name-8x10

Photobucket


Modern Car Custom Birth Announcement Wall Print -
http://www.etsy.com/listing/70536869/modern-car-custom-birth-announcement

Photobucket


Do What You Love, Love What You Do -
http://www.etsy.com/listing/70750317/do-what-you-love-love-what-you-do-wall

Photobucket


Personalized Birth Announcement (Owl in a Tree) Wall Print -
http://www.etsy.com/listing/70750828/personalized-birth-announcement-owl-in-a

Photobucket


Twins with Names and Birthdate Wall Print -
http://www.etsy.com/listing/70463771/twins-with-names-and-birthdate-custom

Photobucket


Flourish Birth Announcement Wall Print -
http://www.etsy.com/listing/70397090/flourish-birth-announcement-wall-art

Photobucket

Sunday, March 27, 2011

Inspiration Sunday - Blogs That Inspire

There are so many wonderful blogs that can be found on the world wide web. It's fantastic when you 'stumble upon' one that you never knew even existed.

I love blogs that have great writing, great photography, great information, inspiring ideas and 'fun' things.
Here are a few blogs that I love and frequent often with a little blurb about each of them.


Photobucket
Apartment Therapy - http://www.apartmenttherapy.com/
I love how Apartment Therapy takes you on inspiring house tours of real life, everyday people. They also feature great finds and wonderful tutorials among other things.


Photobucket
Creature Comforts - http://www.creaturecomfortsblog.com/
Creature Comforts is an inspirational site full of eye candy.


Photobucket
Daily Imprint - http://dailyimprint.blogspot.com/
Daily Imprint is full of inspiring interviews with designers, stylists, photographers and artists.


Photobucket
decor8 - http://decor8blog.com/
decor8, which is a play on the word decorate, is a site with inspiring decorating ideas with spotlights on interior design spaces and independent art.


Photobucket
Design Aglow - http://designaglow.com/blog/
Design Aglow is an online resource for information and products for professional wedding and portrait photographers.


Photobucket
How About Orange - http://www.howaboutorange.blogspot.com/
How About Orange features craft project tutorials, decorating ideas, free downloads, and lots of inspiration.


Photobucket
Made - http://www.dana-made-it.com/
Made features tons of craft and sewing tutorials, guest blog posts and loads of inspiring ideas.


Photobucket
Ohdeedoh - http://www.ohdeedoh.com/
Ohdeedoh takes you on fun tours of children's room. They also feature great finds for kids and fun diy.


Photobucket
Poppytalk - http://poppytalk.blogspot.com/
Poppytalk is a blog that features design inspiration and is dedicated to promoting emerging design talent.


Photobucket
Purl Bee - http://www.purlbee.com/
The Purl Bee is full of fun projects for you to knit, crochet, sew, and stitch. They have some wonderful and detailed tutorials along with kits you can purchase.


Photobucket
Simple As That - http://rebeccacooper.blogspot.com/
Simple As That features fun and creative craft projects, beautiful and inspiring photography, and not to mention weekly giveaways.


Photobucket
UCreate - http://www.u-createcrafts.com/
UCreate is a site all about tutorials - sewing, paper crafts, home decor. They now also have separate sites for 'kid's create', 'foods' and 'parties'.

Friday, March 25, 2011

Friday Etsy Favorites

Here are this week's Friday Etsy favorites! Some beautiful spring finds! ♥

1. Rustic Blend ► Chalkboard Signs Set of 3 Wedding Country
2. VisuaLingual ► Seed Bombs for Guerilla Gardening
3. Hoganfe Handmade Originals ► Sage Green Hydrangea Box
4. Lilydove and Chou Chou ► Rose Pink Vintage Linen Stitched Print
5. Kikuike ► Wedding Cake Topper - Love Owls
6. Graphic Spaces ► Woodland Tree Branch Bookend


Photobucket


Sunday, March 20, 2011

Inspiration Sunday - Landscaping

Last year at this time, my husband and I embarked on a landscaping adventure. We decided that we wanted to have a rock path (replacing all the grass) from the back to the front of our house. And we decided we wanted to do it ourselves. We started digging out our grass. We dug out about 55-60 feet by about 3 1/2 feet and about 4 inches deep. Talk about exercise! We then had crushed rock and 3/4" limestone delivered. We lay down landscape cloth and then the crushed rock. We tamped down the crushed rock and then lay down the 3/4" limestone. What a difference the rock has made. We love it!

We knew we couldn't just stop at laying down the rock. We decided that we wanted to transform our backyard into a little haven not only for us, but for our kids. The entire backyard was simply just grass.

I was at Costco one day and saw a playhouse they had for sale. It was cute, but not practical because even though it would be fine for Tobias for a few years, Mateo would most likely have outgrown it by the next year. So I did some research on different playhouses and finally found one that I loved. It was a playhouse made entirely out of cedar, with cedar shingles as a roof and a porch in the front complete with lattice enclosing it. When I went inside the playhouse that was on display, I could stand up in it with lots of room to spare. We decided that this is the playhouse that we wanted for the kids. When they outgrow it, we could turn it into a tool shed which made it even more practical.

Although this playhouse came with a floor, we didn't want it sitting on the grass, so with my brother-in-law's help, we built a frame and filled it with crushed rock so that the playhouse could sit on top of the crushed rock. It was a large enough frame that to the left side of the playhouse there was an open area that we filled with 3/4" limestone so that the kids had a play area where they could fill their dump trucks with rocks.

I drew out a design of how I wanted the backyard to look like. Where I wanted the playhouse situated, how much grass I wanted to keep and how much garden space I wanted. Our backyard is rectangular in shape and I know that I wanted some curvature in it so it wouldn't look too boxy (is boxy a word?). I also wanted to keep enough grass that the kids could play soccer and have enough space to run around in.

With design in mind, I started digging out the grass. Once I was happy with the shape and an idea of what I wanted to plant and where, the fun started with me planting some small shrubs, trees, and plants. My favorites are the magnolia tree and japanese maples I got from Home Depot and an topiary type tree I bought from Costco. My parents gave me a couple of peony plants from their garden to transplant. I am hoping that they will fair well, as they were in shock last year with the transplant.

With everything planted and in place I wanted to have a distinct border between the garden and the grass, so I decided to get some cement blocks from Home Depot. I had the choice of either placing them horizonal - or vertical |. Although it would have been less expensive to place them horizontal, since it would require less blocks, I didn't feel it would look as good as vertical. So vertical it was. Having never "put" blocks down before, I was kind of flying by the seat of my pants and doing it like I thought it was done. I think it turned out really nice and it sure made a difference in the landscape, not to mention, it is much easier mowing the grass. The last step was to put mulch down. I decided on a brown-red tone mulch. What a difference mulch makes! I love the look of freshly put down mulch!

We are so satisifed with our backyard and are so happy that we did it all by ourselves. Although, it was hard work, it was so truly satisfying knowing that this little haven was the fruit of our own labor.

Wow, I didn't mean to write a novel. Thanks for sticking with me this long! :)

Here is some photos of some inspiring landscaping.


http://www.genevalandscape.com/

Photobucket


http://www.allseasonlandscapers.ca/

Photobucket


http://www.operationbrotherskeeper.org/the-benefit-of-landscaping-to-human.html

Photobucket


http://www.aikenenviroscape.com/

Photobucket


http://interior-decorations-ideas.blogspot.com/2010/07/garden-landscape-design-ideas.html

Photobucket


Friday, March 18, 2011

Friday Etsy Favorites

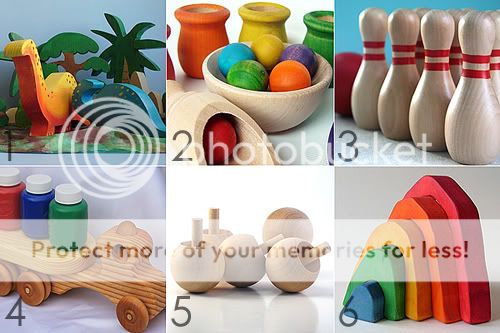
These weeks Friday Etsy Favorites is all about wooden children's toys. I love this selection!

1. The Enchanted Cupboard ► Wooden Toy - Dinosaur Set 1
These dinosaurs are awesome! I love the trees. I love the colors.

2. Mama May i ► Colored Cups and Balls
These colored cups and balls are amazing! So fun and educational!

3. Green Bee Goods ► Woodgrain and Red Mini Bowling Set
I love bowling and this bowling set is too cute! What a blast!

4. A Summer Afternoon ► Natural Wooden Flatbed Truck
What little boy wouldn't love trucks? This truck is no exception. I know my boys would love this! They love to put things on their trucks and roll them around.

5. I Used To Be A Tree ► Flip Flop Tip Tops
I love these paint your own tops. So cute for your child to personalize.

6. Imagination Kids ► Small Rainbow Stacker - Eco-friendly Wooden Toy
This rainbow stacker is so colorful and so much fun. Not to mention, so educational for your child.


Photobucket


Thursday, March 17, 2011

Top O' the Morning to You!

Happy St. Patrick's Day!

It's really interesting reading about the origin of St. Patrick's Day. You can check it out on Wikipedia -
http://en.wikipedia.org/wiki/Saint_Patrick's_Day.

I thought I would put together a few green somethings that caught my eye.
Have a great day!

COLOURlovers - Interior Design Trends: Kelly Green
http://www.colourlovers.com/home/blog/2011/02/05/interior-design-trends-kelly-green

Simply love these dishes, pillow and wallpaper.

Photobucket

Photobucket


Royal Design Studio - Moroccan Stencils: Chez Sheik
http://www.royaldesignstudio.com/shop_stencils_detail.php?id=1709

Wow, these stencils are amazing!

Photobucket

Royal Design Studio - Allover Pattern Stencils: Chain Link
http://www.royaldesignstudio.com/shop_stencils_detail.php?id=1671

I love these ones too!

Photobucket


I love the green accents of the rooms in this home featured in the magazine 'House Beautiful'. Gorgeous!

Photobucket

Photobucket


Simple As That - http://rebeccacooper.blogspot.com
Rebecca has wonderful craft ideas and not to mention beautiful photography!

Shamrock Bouquet - http://rebeccacooper.blogspot.com/2011/03/bouquet-of-shamrocks.html

Photobucket

St. Patrick's Day Banner - http://rebeccacooper.blogspot.com/2011/03/simple-st-patricks-day-banner.html

Photobucket


Coach Kira Bag
http://www.coach.com/online/handbags/Home-10551-10051

I love purses and this one is no exception!

Photobucket


Green Adidas Shoes
http://www.adidas.com/

I would say that 95% of the runners that I have owned have been Adidas. I love Adidas shoes and not to mention clothes and accessories.

Photobucket

Photobucket


Samsung Green Digital Camera
http://www.samsung.com/

Very cool, a green digital camera from Samsung! You could definitely tell right away which one was yours! :)

Photobucket


Wednesday, March 16, 2011

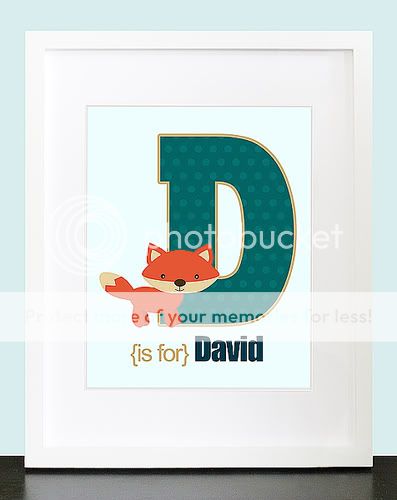
Animal Initial Wall Prints

I wanted to design a series of personalized "Animal Initial" wall prints. I really love how they turned out! They would be perfect for a nursery or child's room or as a special gift.

They are fully customizable in terms of color and if you want polka dots or no polka dots on your letter initial.

I will be designing some more with different forest and jungle animals. So much fun!

Fox Initial With Personalized Name - http://www.etsy.com/listing/70140621/fox-initial-with-personalized-name-wall

Photobucket


Lion Initial With Personalized Name - http://www.etsy.com/listing/69989763/lion-initial-with-personalized-name-wall

Photobucket


Elephant Initial With Personalized Name - http://www.etsy.com/listing/70065494/elephant-initial-with-personalized-name

Photobucket


Hippo Initial With Personalized Name - http://www.etsy.com/listing/69803803/hippo-initial-with-personalized-name

Photobucket

Tuesday, March 15, 2011

Roger's 9 Grain Chocolate Chip Cookies

These cookies are absolutely delicious! They taste good and are so nutritious for the kids. They just gobble them up like little turkeys! :)

Roger's 9 Grain Cereal is made up of wheat flakes, oat flakes, wheat bran, barley flakes, rye flakes, triticale flakes, oat flour, millet, cornmeal, flax seed, sunflower seed, and wheat germ. So much good stuff for my little ones!

I also love the fact that the recipe only uses 3/4 cup flour, 1/2 cup of brown sugar and 1/2 cup of margarine (or butter).

This picture reminds me of the song that Cookie Monster sings on Sesame Street. Maybe because my fingers are making the letter 'C' and I'm holding a cookie? :)

Ok, sing it with me now! :)

C is for cookie, that's good enough for me
Oh, cookie, cookie, cookie starts with C

Photobucket

Roger's 9 Grain Chocolate Chip Cookies

1 1/4 cups Roger's 9 Grain Cereal
3/4 cup flour (I use whole wheat flour)
1/2 tsp baking soda
1/4 tsp salt
1/2 cup margarine or butter
1/2 cup brown sugar
1 egg
1 tsp vanilla
3/4 cups chocolate chips (I add just a little more)
(I also add 2 Tablespoons of ground flax seed for added nutrition)

Preheat the oven to 350°F. Combine dry ingredients then set aside. In a separate large bowl, beat margarine (or butter) with brown sugar. Add in the egg and vanilla and beat until combined. Next add the dry ingredients and chocolate chips. Mix well. Drop by the teaspoon on a greased cookie sheet and flatten with a fork. Bake for 10-12 minutes until golden.
Related Posts Plugin for WordPress, Blogger...